This post is also available in:
 Español
  Português
  Français
By Chilebruers
The STC-1000 temperature controller lets you manually set, within a small margin of variation, the temperature of a fermenter or conditioning vessel placed inside a suitably sized refrigerator, freezer or cooler.

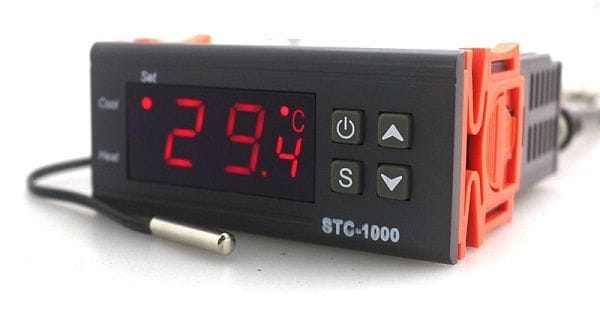
In essence, the STC-1000 turns the refrigerator on until the inside reaches the set temperature and shuts it off once that limit is reached.
When the temperature starts rising again, the controller switches the refrigerator back on, and the cycle repeats continuously, keeping the temperature within a controlled range that matches your specific needs.
Basic considerations
Placing the thermometer probe correctly inside the refrigerator is important. Ideally, with proper sanitation, it should go inside the wort or be attached to the outside of the fermenter.
With the probe outside the fermenter, the refrigerator should be set 2 degrees below the target fermentation temperature, because fermentation itself generates heat. In other words, if you want to ferment at 21 °C, the controller should be set to 19 °C.
Since the STC-1000 has one output for cooling and another for heating, it can also run the opposite process, using the refrigerator as an insulated chamber to hold higher temperatures.
For this you would need a heater inside the chamber or a heat wrap around the fermenter. It works the same way, so the heater turns on to raise the temperature and shuts off when it reaches the set limit.
This kind of temperature control lets you brew any style of beer regardless of the season, which makes it a small investment that adds a lot of value to your brewing process.
Materials needed
1. STC-1000 temperature controller
Always make sure the operating voltage matches the one used in your country, since there are versions for 110 or 220 V AC and for 12 or 24 V DC. The controller comes with mounting clips that let you attach it directly to the waterproof junction box.
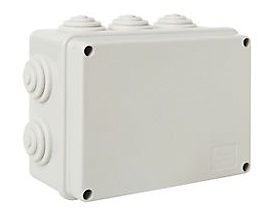
2. Waterproof junction box
All the components are installed inside this 220 x 170 x 120 mm box, which is easy to find at any hardware store that carries electrical supplies.
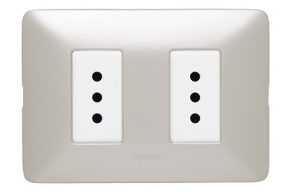
3. Duplex outlet
A duplex outlet is recommended so you can use both controller outputs, one for the refrigerator and one for the heater. This is the outlet where the refrigerator, the heater or both will be plugged in.
4. Electrical cable
Three-conductor cable, 2.5 mm² minimum. You will need 2 meters of cable to connect the controller to the wall outlet and 1 meter for the internal connections between the outlet and the controller.
5. Plug
The standard three-prong male plug that goes into the wall outlet.

6. Electrical tape
Needed to insulate the electrical connections, which ideally should also be soldered for added safety.

Tools needed
At a minimum, the following tools will make the installation go much more smoothly.
1. Screwdriver
Needed to mount the outlet to the box, install the plug and connect the controller wires.
2. Pliers
Used to cut the wires and tighten the connections.
3. Dremel
For cutting the openings in the waterproof junction box for the controller and the outlet.

4. Voltage tester
Recommended, though not essential. A multimeter in continuity mode lets you check that the connections between the outlet and the controller are correct before you plug the box in.
SAFETY NOTE
Wearing gloves and safety glasses is recommended. Working with electricity calls for care and special precautions to avoid an electric shock that could injure people or damage the controller.
Do the entire installation with the plug disconnected from the power supply, and close the box before plugging it back in. The three-conductor cable includes the ground wire, which must reach the ground terminal of each outlet. For the connections, terminals or terminal blocks with heat-shrink tubing over the splices are preferable to electrical tape alone. If you have no experience with electrical work, ask an electrician for help.
How to wire an STC-1000 controller
First, cut the openings in the waterproof junction box based on the dimensions of the controller and the outlet, using a Dremel, a drill or whatever tool you have on hand.
It is always better to start with smaller openings and carefully enlarge them until the components fit into the box without forcing them.
The controller comes with orange clips that hold it in the box without screws or any extra hardware. The outlet uses a pair of screws that must be tightened to secure it to the box.
This type of box has rubber grommets that can be pierced to feed in the power cord and route out the probe cable that will measure the temperature.
Finally, label each outlet on the box so you know which one is for the refrigerator and which one is for the heater.
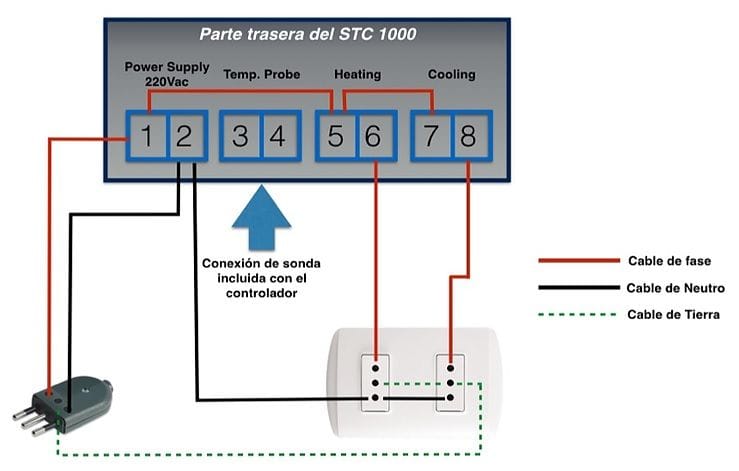
The STC-1000 has eight numbered terminals on the back. Terminals 1 and 2 take the power supply, with the live (hot) wire on 1 and the neutral on 2. Terminals 3 and 4 are for the temperature probe, which has no polarity. Terminals 5 and 6 close the heater circuit and terminals 7 and 8 close the refrigerator circuit (STC-1000 manual).
The controller relays are dry contacts (voltage-free), which means they only open or close the flow of current. That is why the live wire that reaches terminal 1 is also carried, with a jumper wire, to terminals 5 and 7. The live wire runs from terminal 6 to the heater outlet and from terminal 8 to the refrigerator outlet. The neutral and the ground from the power cord go straight to both outlets without passing through the controller.
How to set up the STC-1000
With the controller on, the display shows the actual temperature. To enter the parameter menu, press and hold the S button for 3 seconds. Use the arrows to move from one code to the next, and press S to display the value of the selected code. To change it, hold S down while using the arrows. When you are done, press the power button to save. If no button is pressed for 30 seconds, the controller returns to the normal display without saving the changes.
The menu has four parameters, with the following ranges and factory settings according to the STC-1000 manual.
| Code | Function | Range | Factory setting |
|---|---|---|---|
| F1 | Target temperature | -50 to 99 °C | 10 °C |
| F2 | Differential | 1 to 10 °C | 3 °C |
| F3 | Compressor delay | 1 to 10 minutes | 3 minutes |
| F4 | Probe calibration | -10 to 10 °C | 0 °C |
Recommended settings for fermentation
The controller starts cooling when the actual temperature rises above the target temperature plus the F2 differential, and stops cooling once it drops back to the target temperature. Heating works the same way in reverse. In the manual’s example, with F1 at 10 °C and F2 at 3 °C, the heater turns on at 7 °C and off at 10 °C, while the refrigerator turns on at 13 °C and off at 10 °C.
For fermentation, it is best to lower F2 to 1 °C, the minimum listed in the manual’s code table. With the factory setting of 3 °C, the beer could swing 6 °C between the point where the heater turns on and the point where the refrigerator turns on. The F3 delay keeps the refrigerator compressor from restarting too soon, so it is best left at its factory setting. F4 is adjusted by comparing the probe reading against a reference thermometer.
Following the earlier example, to ferment at 21 °C with the probe outside the fermenter, set F1 to 19 °C, F2 to 1 °C and F3 to 3 minutes. For a lager, set F1 to the temperature recommended by the manufacturer of the lager yeast you choose.
Frequently Asked Questions (FAQ)
1. What is an STC-1000 controller used for in brewing?
It keeps the fermenter temperature within a set range. It switches a refrigerator or a heater on and off based on its probe reading, which lets you ferment in any season of the year.
2. How do you wire the STC-1000?
Terminals 1 and 2 take the power supply, terminals 3 and 4 the probe, terminals 5 and 6 the heater and terminals 7 and 8 the refrigerator. The live wire is carried with a jumper to terminals 5 and 7, and the neutral and ground go straight to the outlets.
3. What F2 differential should you use for fermenting beer?
It is best to lower F2 to 1 °C, the minimum in the manual’s table. With the factory setting of 3 °C, the fermenter temperature could swing as much as 6 °C.
4. What voltage does the STC-1000 need?
There are versions for 110 or 220 V AC and for 12 or 24 V DC. Choose the one that matches the power grid in the country where you will use it.
5. Where should the temperature probe go?
Ideally inside the wort, with proper sanitation, or taped to the fermenter. If the probe measures the air inside the refrigerator, the set temperature should be about 2 °C below the target fermentation temperature, because fermentation generates heat.
Bibliography
- Atfinger Technology, STC-1000 Temperature Controller Operating Manual
- Useful Data, STC-1000 temperature controller 2x relay heating-cooling, review and manual

Recommended
- Aromas and flavors of my beer: yeast and fermentation
- PLAATO, the first digital airlock for remote fermentation monitoring